
Statement of intent
Aim:
My aim is to produce a website page of work demonstrating my ideas, knowledge, creative work, reflection and development on my chosen theme of colourful portraits. By the end I will hopefully have a collected amount of photos that I am happy with and will display these in a final gallery.
Initial research:
For my initial research I will start to look at portraits with bright colour being put creatively into the image. The photographers I want to look into are Graham Owen and Magdiel lopez. I've decided to look at Graham Owen as he is known for his close- up portraits and I am interested in doing some shots closer to the face and just the eyes. The reason I have chosen this photographer is because his photos are very unique and vivid, making people drawn to them. I'm interested in 2 photographers they both display their work differently and I think if I can combined the 2 styles including my own knowledge and creative work I could have an interesting, distinctive result.
Magdiel Lopez is a Cuban creative director based in Dallas, Texas. I like his posters because they have a unique style and express his daily ideas and thoughts. The neon color, minimalism, and photography are the constant aesthetic of his posters. This style has allowed him to create a series of posters that are unique on its own and also form part of a bigger picture of his daily poster project.
Theme:
I chose the Portrait theme of 'colour', when I chose it my initial thoughts were thinking a lot about Photoshop so I could add layers of colour, make colour more vibrant and draw on the images. However after thinking I then realised I could used both colourful light and props such as flowers too, in order to capture the luminescence in the photos.
Showing progress:
To show progression through my work I will keep the work simple at first so maybe just one prop or one light but then as I develop my knowledge and understanding I will add more lights and props to make the shoots more complex and the images more eye-catching. I will be sure to upload all the images in galleries in the order I have taken them to clearly show my progress in this project.
Experimenting:
When experimenting I would like to use a wide range of techniques and props within my work. I will be taking both full face and close- up portraits . The coloured props I would want to experiment with are lights, CD's and flowers they'll make the images more aglow and eye-catching. This will most likely be done in a studio setup. So the model stands out I will experiment with a low aperture so only the model is in focus and the viewer is drawn to them. The shutter speed will be quite high so that all the action is frozen as I might ask the model to spin around or flip their hair. I will then refine my images by experimenting with Photoshop, touching up my images and get used to how it works. I will explore different filters, tools and layers and will use on-line tutorials to stretch my outcomes and develop my knowledge.
Time line:
I have 2-3 months to produce my page of work towards the production of my final piece. I aim to do about 10 photo shoots maximum. For the first week I will probably be getting used to the camera, using the manual settings so I can control my shots and Photoshop. However I aim to do one shoot every week or two on a Tuesday on the Thursday. I will edit and upload the photos from the shoot into their appropriate galleries then do the best and worst. I will then have a 8 hour practical exam at the end of the project where I will print my final photos which I am content with.
What I will do as my work progresses:
As my project progresses I will show the best and worst images from a shoots gallery showing I understand my mistakes this further develops my knowledge. Also I will add snipits of my work in Photoshop before uploading to the end picture. This demonstrates how I got the the final image and that I understood what I did and reflect on the work I produce. However I will mainly seek advice from peers who are doing the same theme as me (colour) and teachers on how to improve my work. After I have put together my final piece I will write a final evaluation on the project as a whole , reflecting on what went well and what I come do differently or change at a given time.
Mood board


I have chosen these images because I like the way the colour makes the image pop and stand out. This inspires me to want to learn how to take images of people then edit then with colour on Photoshop to create something new and unique.
Mindmap research
Made with coggle.

Photography mock
Composition:
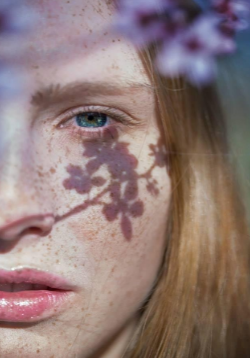
The composition in this image is very pleasantly and cleverly placed. The girls eye is in the sweet
spot and the green blue colour of the eye stands out making it the main area of focus. The shadows of
the flower and the burred flower on top play an important part in the composition and framing as
they balance the image out.
It is clear that it was taken with a low aperture e.g f4 as the depth of feild is quite shallow This
massively helps to keep the model in focus and emphasise her facial features. I think the shutterspeed
was high so if the model made a slight moved it wouldnt matter too much and so if the camera
moved the photographer most definately used a tripod.
In my opinion the image was taken at the models eye level. I can tell this as its clear she is looking
straight and there are no shadows on her face from her nose or eyelashes. This has the effect the
model is looking right into the camera making it more dramatic and creates the impact the model is
looking at us.
The ISO was most likely on auto as the lighting looks very natural however it looks as if its been
enhanced in photoshop. This is because the models lips, blue eyes and red hair look a lot more
vibrant than they would've in real life. Therefore I think the photographer has increased the vibrance
a little in photoshop in order to make it more visually colourful and striking.
I can tell by the light on the model's nose, lips and a little in her eye that the light source in in front of
her. As the light is white I think there a spot light. The white spot light lights up the models face well
and goes well with the lilac purple flowers. However I also think that this image was taken outside in
the sun because the models skin and her hair is slightly golden on the right side this could possibly
be from the sun from the golden hour. So this image has both artificial and natural light they both
work well together and have been used well so the photo is not over exposed.
Connection/inspiration:
Personally, I like this image as its quite dramatic and visually pleasing. I love the use of colours and
how they've been made more vibrant to standout but also do blend and work nicely together. This
image can link in with my work at it has used the natural lighting of the suns golden hour which I
like to do for landscapes. It also could maybe inspire me to combine both portrait and landscape
photography using both artificial and natural light to create unique and meaningful outcomes.

Composition:
The composition in this image plainly follows rule of thirds. As the model is simply in the left third
making him the main focus against the black background.
It is clear that it was taken with a low aperture e.g f4 as the depth of field is quite shallow This
massively helps to keep the model in focus and emphasise his facial features. I think the shutterspeed
was high so if the model made a slight moved it wouldn't matter too much and so if the camera
moved the photographer most definitely used a tripod.
In my opinion the image was taken at the models eye level. Showing the impact that the model is
looking right into the camera making it more dramatic. The black background also creates a dramatic
impact it also makes sure no light reflects on it because it so dark further emphasising the models
face.
The ISO was most likely on auto as the lighting looks very normal and doesnt look like its been
enhanced in photoshop. I think the only reason the photographer would've used photoshop is to
correct any over exposed sections if there was any.
I can tell by the light on the left side of the models face that the light source is on the left of him. As
the light is white I think there a spot light. The white spot light lights up the left side models face
well and creates a shadow on the right side. I also think that this image was taken in a studio set up
with the black backdrop. As it doesn't look natural at all.
Connection/inspiration:
Personally, I like how this image is very striking. However this image doesn't link in with my work at
it has used artificial lighting being a spot light and I prefer more natural and colourful photography in
both portraits and landscapes. So I don't think I will take inspiration from this photo.
The 4 C's

Context:
The image was taken in 1936, Florence Thompson (the mother) allowed Dorothea Lange (The photographer) to photograph her family because she thought it might help promote the unfortunate state of the working poor.
The image was taken in 1936, Florence Thompson (the mother) allowed Dorothea Lange (The photographer) to photograph her family because she thought it might help promote the unfortunate state of the working poor.
Composition:
The composition in this image plainly follows rule of thirds. As the mother is in the centre the boys' heads are in the sweet spots, as they are on either third on the mother.
The photo has been taken at an eye level, this is very effective because it massively helps to keep the model in focus and emphasise the mother's sad facial expression. It has a shallow depth of field so the aperture was probably on f4.5. Also the image is black and white which in my opinion this further shows the sad emotion.
The mother and the children are in crisp focus so the shutter speed must be quite high e.g 1/4000 so if they made a slight moved it wouldn't matter too much and so if the camera moved the photographer most definitely used a tripod.
In my opinion the image was taken at the eye level. Showing the impact that the model is
looking in to the distance making it more dramatic. The fact its black and white also creates a dramatic
impact.
The ISO was most likely on auto as the lighting looks quite natural and doesnt look like its been enhanced in photoshop. I think the only reason the photographer would've used photoshop is to correct any over exposed sections if there was any and add the black and white filter.
The ISO is most likely on auto as the lighting looks quite natural. the mother and the children are in crisp focus so the shutter speed must be quite high e.g 1/4000.
Connection:
The theme for this portrait the great depression and poverty it is also black and white. It is a powerful image however it doesn't link in with the bright colour theme I have chosen and colour promotes more happiness but black and whit promote sadness and misery .
Comment:
The image makes me feel sad and sympathetic for everyone who is living in poverty. Although I do not have the same theme want to use the idea of taking images at eye level as in my opinion its makes the viewer drawn to it and makes the image more effective.

Context:
“Born in Havana Cuba, Magdiel Lopez spent his childhood years inspired by the colourful culture that surrounded him. Naturally, such upbringing played an integral part in forming Lopez’s keen sense of style, art and design, which can be realised in his works today. Looking for freedom and a better life, Lopez moved to the United States at fifteen, where he continued working on his skill for the next 10 years privately.
“Born in Havana Cuba, Magdiel Lopez spent his childhood years inspired by the colourful culture that surrounded him. Naturally, such upbringing played an integral part in forming Lopez’s keen sense of style, art and design, which can be realised in his works today. Looking for freedom and a better life, Lopez moved to the United States at fifteen, where he continued working on his skill for the next 10 years privately.
Content:
In this image I can see the profile of a woman’s face, a mountain, clouds and a sun. In my opinion I think the image has been inspired by a Japanese style to it, this is suggested by the graphic effect that reminds my of a Japanese print Magdiel Lopez 's photoshop images are quite minimal in content, with a strong graphic element and simple style that makes them stand out and more eye-catching in my opinion. There is a clear change in colour to the background, starting from the top it goes from pink to orange to a clear cut into green then a light beige at the end. This colour gradient change makes my think its light a animated, artificial sunset with the clouds, sun and mountain.
Composition:
There are strong leading line of the horizon right in the middle of the image, highlighted by the difference in the 2 background colours to contrast. The colours in the background do not blend there are soft cuts between each shade this makes the the image even bolder.
There is rule of thirds used, as the woman face is in the top third, this makes it stand out, especially with the bright pink background colour and the top half of the face is in the 'sweet spot'
I can clearly see the of photoshop to enhance the image. It is probably a studio set-up initially of a side profile and then enhanced, modelled the hair, make-up and the professional lighting taken on a green screen.
The image has most likely been layered in this order: the coloured background, the sun, the mountain, the clouds, then the woman's face. Its a very clear image, so fast shutter speed against a natural background so it could be manipulated easily in photoshop. I think the photographer has used a tripod as the image looks very straight.
Connection:
This portrait connects to my work as I am using the similar bright, vivid colours and using a lot of photoshop as well. I will use a tutorial on Madgiel Lopaz's work in order to get a similar result. I will create a similar end image but not in the form of a magazine cover or a poster. I will take inspiration from this as I really like the idea of bold coloured backgrounds and contrasting lines. I will use similar photoshop tools such as fill
Comment:
I really love this image as its very dramatic and striking to me. In my opinion it gives off a very peaceful vibe that is the mood I want to create with my work.
Plan

My starting point is taking inspiration from the photographer Magdiel Lopaz who focuses on bright colours in photography. I like the way he uses Photoshop to add animated, bright colour on and around the model.
His work inspires me to want to learn how to use Photoshop to edit the portraits and make them more vivid and attractive to look at.
So the model stands out I will use a low aperture so only the model is in focus and the viewer is drawn to them. The shutter speed will be quite high so that all the action is frozen as I might ask the model to spin around or flip their hair.
For the model I'm going to use my sister which is good so I can take the portraits at home with colourful props that I have however I could also do it with some people in my photography class at school with all the school equipment. Having more than one model will make the final photos more interesting.
For the model I'm going to use my sister which is good so I can take the portraits at home with colourful props that I have however I could also do it with some people in my photography class at school with all the school equipment. Having more than one model will make the final photos more interesting.
The coloured props I would want to use are lights, flowers, paint, makeup and Photoshop they'll make the images more aglow and eye-catching.


To make sure I don't move the camera I will use a tripod so its still and steady In my opinion it would be better to use a darker background so it contrasts with the bright colour on the model further making them stand out. Therefore the location would be a dark room or in the evening when the sky is darker.


However I might decide to use Photoshop to colour in the background with bright colour. To get something similar to the image on the left.

For the lighting I will use a single light or lamp to light up the model. I will use a lamp and shine it behind the camera so the models face is fully lit up.
I also am going to do some eye portrait photography these images inspired me.


I want to use Photoshop to draw on and around the eyes with bright colour in order to make them more interesting and striking.
Shoot 1


In the gallery above I used a CD and put a lamps light on it then reflected the rainbow onto the face on the model. I mostly followed the rules of rule of third and used a dark background to contrast with the vivid coloured light.
Best and worst


The best image is the one on the left as it is in sharp focus and the colours are vibrant and clear unlike the worst image on the right. It is blurred and unclear as I had moved the camera so I could have used a tripod.
Shoot 2


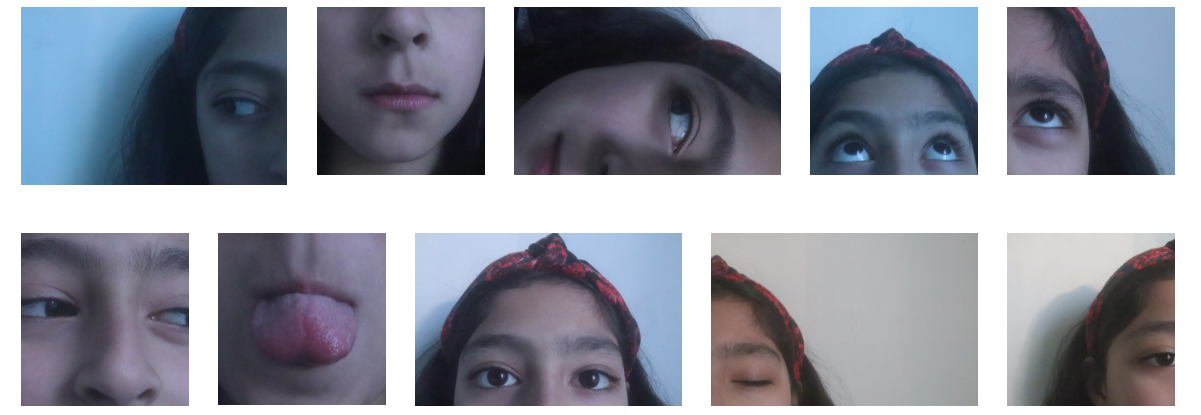
In this gallery I did more close up shots of the eyes. I was in a dark room and put a rainbow light onto the models face.
Best and worst
The best image is on the left as it is sharp, in focus and colour is really effective. The worst image from the gallery above is on the right as there is a shadow on the face from the nose making the image slightly blurry and less pleasing to look at.
Shoot 3
Shoot 3


In this gallery I used coloured lights and a black background.
Best and worst
The worst image of the gallery above is the one on the right as it is a bit blurry and unclear. The best image is the one on in the left as it is in focus and the glasses are bright and stand out.
Shoot 4
Shoot 4


In the gallery above I used a light which had a rose in it and got close up shots of half the face and a fake flower and focused on the eyes.
Best and worst
The best image is on the left as it is clear and in focus and the flower makes it more visually attractive. The image on the right is a bit darker on one side of the face and isn't as visually pleasing.
Shoot 5
Shoot 5


Best and worst
The worst image from the gallery above is on the right as the exposure isn't right therefore it is blurry. The best image is on the left as it is in clear focus and the bright purple is seen behind. There is even a shadow which I think makes it more effective and a little more interesting.
Photoshop
Before photoshop
Before photoshop


After photoshop
After photoshop
Before photoshop


After photoshop
After photoshop

Before photoshop


After photoshop
After photoshop

Before photoshop


After photoshop
After photoshop

Before photoshop


After photoshop

B&W shoot
Developing and refining my images further by using my phone camera to give me different effects.

Best and worst
Best and worst


The best image is on the left as its clear in focus and not too dark. Also the light pattern on the face shows my skills using different effects and the light orange colour is pleasant to look at. The worst image is on the right as its a bit too dark and the light pattern is blurry on the face.


I took the photo shoot above then added the black and white filters from my the camera app on my phone. The filters were mono, silvertone and noir. To make some images more clear I had to edit the sharpness, exposure and definition on the images.
I really like the effect of the black and white filters it makes the model look very dramatic and the sharpness in some of the images unveils details from the shadows on the face.
I think next time I think I will try this with all the other filters so not just the black and white ones.
The gallery of finished images is below.

Close up shoot
Close up shoot
Developing and refining my images further by using my phone camera to give me different effects.
Best and worst


The best images from the gallery about is the one on the left as its sharp and in focus. The worst image from the gallery above is the one on the right as its too zoomed in and isn't as clear and there would not be a lot to edit in either photoshop or snapseed.

I used the phone app snapseed to edit some of the images in the gallery above. I personally found it quite hard to do with my fingers and prefer photoshop on the computer.
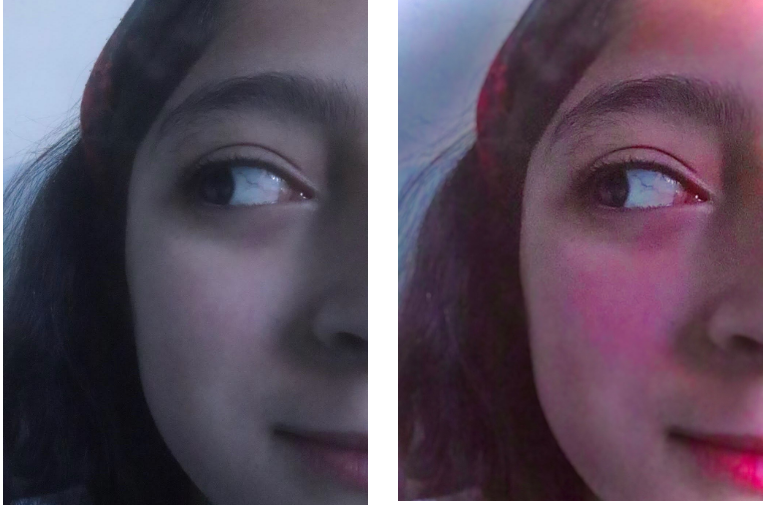
Before and after snapseed


To edit the image above I used the purple tint filter to add some colour and adjusted the exposure and brightness to settle the purple. I tried to use the healing tool to fix up the hairs around the image however it kept smudging so isn't as neat as it could be. Also I used a dark vignette to soften the edges of the image.
Before and after snapseed
To edit the portrait above I experimented with the edits on snapseed. Here is what I set the edits to brightness -28, contrast +34, saturation +87, ambience +45, highlights -100, shadows +6, warmth +20, structure +63 and sharpening +100. With these set it makes the the pink in the image stand out making it overall more striking to me. Also I used a dark vignette to soften the edges of the image. However I find that the image isn't very refined or polished as opposed to photoshop.
Final gallery

Evaluation
Firstly I chose the theme colour for my portraits (However I did experiment with black and white portraits as well). I chose this theme because I wanted to make the images pop and eye catching. I believe I have achieved that with the final gallery of images I have.
Photoshop was the most interesting and fun part of this project for me. This is because it is where I had to add the colourful element to the portraits using my mood board, imagination and creativeness.
When taking the images in the studio set up I learnt how set the camera settings correctly to fit a rooms natural lighting. Also I had never used Photoshop before so I experienced many new skills on it. This included adding more layers to add a vivid background, changing and adjusting the vibrance, exposure, curves and saturation. I would love to improve my Photoshop skills further as I know that there is so much more that I can do to an image. The technique enjoyed the most was either editing my photos or actually taken them because they are both very enjoyable to do in my opinion.
Most of my photography research was about Mandiez Lopez as he takes very bright multicoloured portraits I took a lot of inspiration from his work. There was also the photographer Graham Owen I researched about him as he does close up shots of the face. I took inspiration from both of them when I did the shoots with the glasses. Both of their work together influenced my project as the photos in my end gallery include elements from both of their work.
I feel the most successful part of this project was the my website page because it all flowed and had a clear improvement this then demonstrates the successful improvement and journey in Photoshop because I learnt and developed new skills in it as the project went on.
There was a small setback with the purple image with the glasses as I couldn't work out how to add the drips of purple neatly. It took a lot of re-doing and rubbing out. However I just used the same same with the drips on each glasses lens to fix it, therefore its now symmetrical. So I then learnt you can copy and paste your own shapes on Photoshop from it.
If I was given a chance to complete the project again I would try to make more final images and make them include much more complex skills in Photoshop so they're a Little less basic. I would also take less time dealing with the set up and props in order to give me more more time to take pictures and more potential for better results.
